There’s nothing like New England weather! Now that it’s becoming cold and getting darker earlier, I find us spending more time inside the house then outside. I try my best to keep the kids busy with things other then just tv. I would love to share some of my (and others) fall craft ideas that we have done.
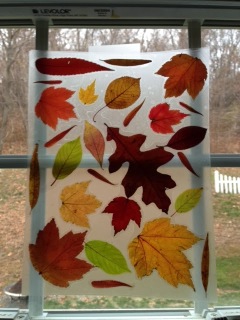
Fall Inspired Sun Catchers
What you need: Contact Paper, Different color/style leaves.
1. Cut an equal amount of contact paper to your desired length and width.
2. Peel paper off and keep sticky side up.
3. Place leaves on sticky side of contact paper until there is not much space left.
4. Peel paper off other piece of contact paper and (sticky side down) place contact paper over leaves. Make sure the corners match up. If not, you can cut the contact paper so there is no exposed stickiness.
5. Hang on a window and enjoy.
(I’m not going to take the credit for this fall idea. Thank you for introducing this craft to me Katie C.)
Pumpkin Painting
It’s as simple as it sounds. This worked out great because my kids were too young to carve their pumpkins the first few years of life. At 4 and 2.5, they still seem to enjoy painting their pumpkins more then carving them.
What you’ll need: Pumpkin (any size) Paint Brush, Halloween Themed Foam Stickers, Paint, (I used Crayola Washable Kid’s Paint w/Glitter from Michael’s) Pipe Cleaners, Colorful Puff Balls.
1. Start with your child painting their pumpkin. Make a design or just let them go at it.
2. Add Halloween foam stickers to desired areas.
3. Stick puff balls in wet paint so they stick.
4. You can stick the pipe cleaners into the pumpkin to make ears or wrap it around the pumpkin stem.
5. Let it dry and you’re done!
Hand Print Turkeys
This can get a little messy.
What you’ll need: Plain Scrapbook Paper, Red, Orange, Yellow, Brown and Green Felt, Brown, Red, Yellow, Orange and Green Paint, Paint Brush, Orange Sharpie, Glue Stick, Googly Eyes
1. Cut felt into small squares. Glue them to the paper, creating a border.
2. Have your child spread their fingers. Paint your child’s thumb and palm brown.
3. Paint each remaining finger red, yellow, green and orange.
4. Slowly place your child’s hand on the paper, making a hand print.
5. Once the paint has dried-draw a beak and legs with your sharpie.
6. Glue the googly eye on and you’re done!
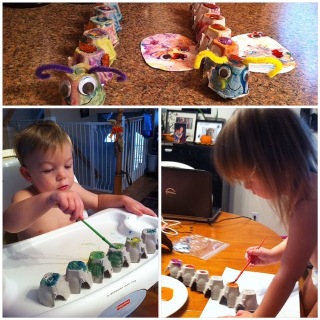
Egg Carton Caterpillars
What you’ll need: Empty Egg Carton, Paint, Paint Brushes, Glitter, Googly Eyes, Pipe Cleaners
1. Cut the lid off of an empty egg carton then discard.
2. Cut down the center off the bottom part of the carton, making two caterpillar bodies.
3. Make two holes at the head of the caterpillar and insert a pipe cleaner for antennae.
4. Paint the body.
5. Sprinkle with glitter.
6. Glue on googly eyes and done!
The Thankful Tree
Why not teach your little ones what it means to be thankful, not only because Thanksgiving is around the corner, but because they are lucky year round.
What you’ll need: Tall Vase, Small Tree Branches (from the store or from your backyard) Construction Paper, Sharpie/Pencil, Ribbon or String, Hole Punch
1. Place tree branches in vase.
2. Cut construction paper into leaves or your desired shape.
3. Have your child write (or write for them) what they are thankful for onto the leaf.
4. Punch a hole into the leaf and pull string/ribbon through and tie gently.
5. Have your child(ren) pick a branch and help them tie the ribbon to the branch.
There’s no set limit to how many leaves you can have. Maybe you’ll be surprised by how many things your kids are grateful for.
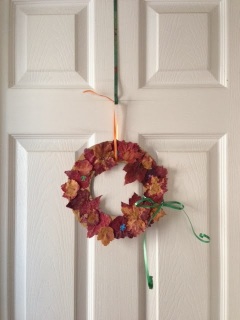
Fall Wreath
What you’ll need: Cardboard, Glue, Leaves, Ribbon, Acorns
1. Collect fall leaves and acorns.
2. Cut a circle from your piece of cardboard. Cut a smaller circle in the center of your first circle.
3. Gently glue your autumn leaves and acorns all around the cardboard.
4. Tie ribbon around the cardboard wreath and hang.


